Acrylic sheets, known for their clarity, durability, and versatility, are widely used in applications such as signage, retail displays, protective barriers, and DIY projects like custom furniture or home decor. Both thick and thin sheets require special consideration for fastening.
Their lightweight yet robust nature makes them a popular alternative to glass, but securing them properly requires careful consideration.
Using the right screws for acrylic sheets is critical to prevent cracking or damage, as acrylic is prone to stress fractures if mishandled; using the right technique ensures a fine, crack-free finish.
This guide will walk you through the key considerations and best practices for using screws with acrylic sheets, helping you achieve professional-quality results every time.
Tools Required To Secure Acrylic Sheets
To securely fasten acrylic sheets while minimizing the risk of damage, specific materials and tools are essential. Below is a detailed overview of what you’ll need:
Types of Screws for Acrylic Sheets
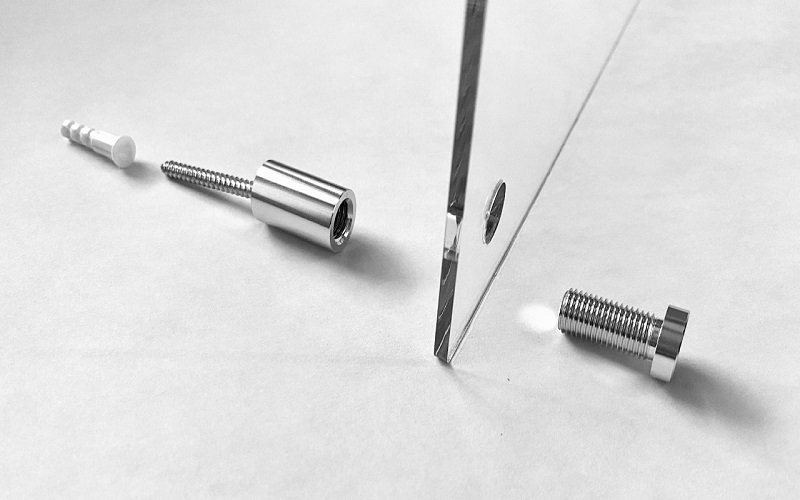
- Self-Tapping Screws: These screws cut their own threads into the acrylic, ideal for quick installations but require careful handling to avoid over-tightening, which can crack the material.
- Machine Screws: Used with pre-threaded inserts or nuts, these provide a strong, reliable hold and are suitable for applications requiring frequent disassembly.
- Plastic-Specific Screws: Designed with coarse threads and smooth shanks, these screws reduce stress on acrylic sheets, minimizing the risk of cracking or splitting.
Additional Hardware
- Washers: Flat or rubber-backed washers help distribute the screw’s pressure evenly, preventing localized stress that could damage the acrylic.
- Spacers: These maintain a gap between the acrylic and the mounting surface, allowing for thermal expansion and reducing the risk of warping.
- Anchors: For mounting acrylic sheets to walls or other surfaces, anchors provide a secure base, especially in drywall or masonry.
Essential Tools
- Drill: A variable-speed drill with a clutch to control torque, preventing over-drilling or cracking of the acrylic.
- Screwdriver: Manual or powered screwdrivers with appropriate bits (e.g., Phillips or flathead) for precise screw installation.
- Measuring Tape: For accurate marking of screw placement to ensure alignment and a professional finish.
- Protective Gear: Safety glasses and gloves to protect against acrylic dust and sharp edges during cutting or drilling.
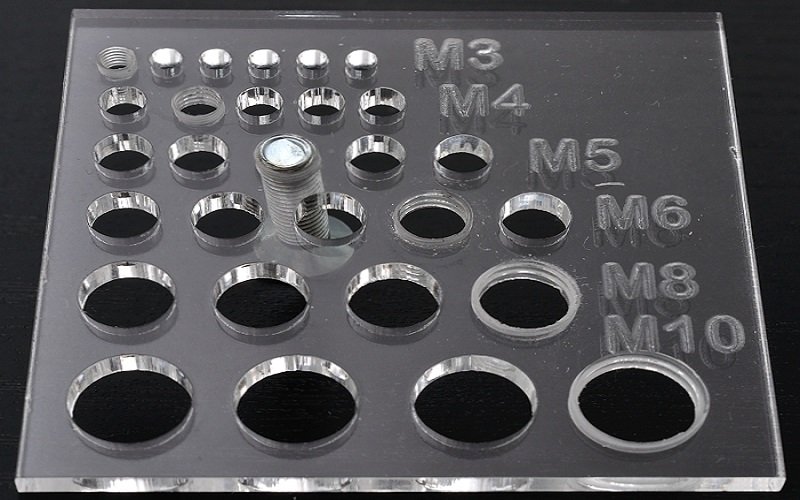
Screw Sizes and Materials
- Screw Sizes: Common sizes for acrylic sheets range from #6 to #10 (3.5mm to 5mm in diameter), with lengths typically between 1/2 inch to 1 inch (12mm to 25mm), depending on the sheet thickness (e.g., 1/8” to 1/4” or 3mm to 6mm).
- Materials: Stainless steel screws are preferred for their corrosion resistance and durability, especially in outdoor applications. Plastic-coated or nylon screws are also excellent choices, as they reduce friction and stress on the acrylic, enhancing longevity and safety. Aluminum screws can be used as a lightweight alternative, offering good corrosion resistance and strength suitable for many acrylic fastening needs.
Having these materials and tools on hand ensures a smooth, damage-free installation of acrylic sheets, tailored to your specific project needs.

Steps Of Using Screws for Acrylic Sheets
Securing acrylic sheets with screws requires precision and care to prevent damage such as cracking or stress marks.
Understanding how acrylic behaves during processing, especially during drilling and tapping, is key to preventing damage when using screws. Follow these detailed steps for a successful installation:
Step 1: Drilling Pilot Holes
Carefully drill pilot holes in the acrylic sheet using a variable-speed drill equipped with a drill bit slightly smaller than the screw’s major diameter (e.g., for a 4mm screw, use a 3.2mm bit).
Drill at a low speed to avoid overheating, which can melt or crack the acrylic. Careful drilling at low speed also helps prevent tearing of the acrylic edges.
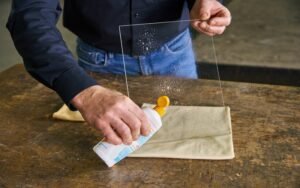
Ensure the sheet is clamped securely to a flat surface, and place a piece of scrap wood underneath to prevent chipping as the drill exits.
Clean away any debris to maintain a smooth surface. After drilling, use a countersink bit to create a slight bevel for the screw head; this counter helps achieve a flush finish and reduces the risk of tearing the acrylic during assembly.
Step 2: Aligning the Acrylic Sheet
Position the acrylic sheet precisely on the mounting surface, ensuring proper alignment with marked points or pre-drilled holes on the base material.
Use a level or measuring tape to confirm even placement, especially for larger sheets or multi-point installations.
If mounting to a wall or frame, double-check that anchors or supports are in place to handle the load, reducing stress on the acrylic during fastening.
Step 3: Inserting and Tightening Screws
Gently insert the appropriate screws for acrylic sheets (e.g., plastic-specific or machine screws) into the pilot holes. It is suggested to turn the screw slowly and stop as soon as resistance is felt to avoid over-tightening.
Tighten the screws using a manual or low-torque powered screwdriver, stopping just as the screw head makes contact with the sheet or washer. Avoid over-tightening, as excessive force can cause cracking or deformation.
Be careful not to insert the screw too deep, as this can cause you to lose the proper fit and risk damaging the acrylic. For self-tapping screws, ensure slow, steady pressure to allow proper thread formation.
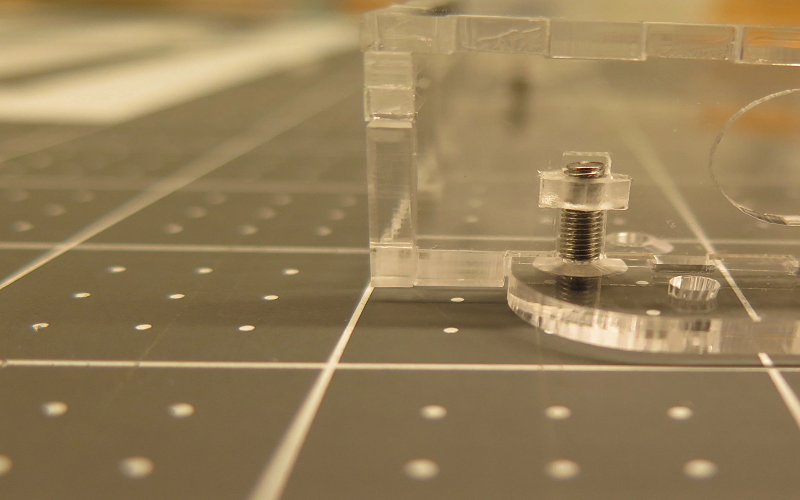
Step 4: Adding Washers or Caps
Place flat or rubber-backed washers beneath the screw heads to distribute pressure evenly and protect the acrylic from direct contact, reducing the risk of stress fractures.
For a polished appearance, add decorative caps over the screw heads to cover the hardware and enhance the aesthetic. Ensure all components are snug but not overly tight to maintain the integrity of the acrylic sheet.
By following these steps, you can securely fasten acrylic sheets while preserving their clarity and structural integrity for a professional, long-lasting result.
The Process Of Tapping Acrylic Sheet
Preparing for Tapping Acrylic Sheets
Tapping acrylic sheets requires precision and care to avoid cracking or damaging the material. The process starts by selecting the correct drill bit size, which should be slightly smaller than the screw’s major diameter to create an appropriate pilot hole.
This hole size is critical to ensure that the threads cut by the tap hold securely without exerting excessive pressure on the acrylic.
Creating A Drilled Hole
Before tapping, it is advisable to drill a clean, straight hole using a suitable drill bit designed for plastics, ideally at a slow speed to prevent heat buildup and material melting.
Applying a lubricant such as water or a light oil during drilling and tapping can help reduce friction, resulting in smoother threads and extending the life of the tap.
Using a Cordless Drill for Tapping Process
Alignment during tapping is crucial; using hand taps or a cordless drill with careful control can help maintain the correct angle and prevent thread tearing.
When using an NPT tap, remember that the taper of the tap means you should only run it partway into the hole—especially in thin acrylic—to avoid leaks.
For best results, tapping should be done slowly and steadily, allowing the tap to cut clean threads without forcing or binding.
After a couple of test runs, you may find the best depth for a properly tapped hole. Some guys have found that tapping at a slight angle can help achieve a better seal and reduce the chance of a leak. In my experience, I thought that going deeper would help, but it actually increased the risk of leaks.
Special Considerations for Blind Holes and CNC Tapping
When tapping blind holes (holes that do not go all the way through), extra caution is needed to avoid over-tapping, which can cause the threads to break or the acrylic to crack.
In some cases, using a CNC machine for tapping can provide greater precision and consistency, especially for thicker or more complex parts.
Finishing Touches
After tapping, it is important to remove any debris from the threads to ensure a proper fit for the screw or bolt. Using washers and spacers can help distribute pressure evenly and prevent localized stress that might otherwise cause cracking or leaks.
Matching Screws For Acrylic Sheets With Different Thicknesses
When working with acrylic sheets of varying thicknesses, selecting the right screws is crucial to ensure a secure fit without causing damage.
Thinner sheets require screws that provide enough grip without exerting excessive pressure, while thicker sheets can accommodate longer screws that offer greater holding strength.
Exploring different screw types and sizes can help you find the perfect match for your specific project. For example, using screws designed for plastics or those with a fine thread pitch can reduce the risk of cracking, especially in delicate or thin acrylic.
Here are some helpful tips to keep in mind during this process:
- Always pre-drill holes slightly smaller than the screw diameter to prevent splitting.
- Use washers or spacers to distribute pressure evenly, especially on thinner sheets.
- Avoid over-tightening screws to reduce stress on the acrylic.
- Consider using screws compatible with laser-cut acrylic parts for precise fits.
It can be difficult to find the ideal screw without trial and error, but careful planning and attention to detail will save time and materials in the long run. It’s also worth mentioning that proper lubrication during the tapping process can make installation smoother and extend the life of your tools.
By following these guidelines and exploring suitable screw options, you can achieve a professional-quality finish that maintains the integrity and appearance of your acrylic sheets.
Conclusion
Using screws for acrylic sheets requires careful attention to detail to avoid cracking and ensure a secure, lasting hold.
By selecting the right type and size of screws, pre-drilling appropriate pilot holes, and applying proper tapping techniques—whether by hand or with a cordless drill—you can achieve professional results.
Incorporating lubricants during drilling and tapping, maintaining precise alignment, and using washers or spacers to distribute pressure further protect the acrylic from damage.
Whether working with thin or thick sheets, following these best practices will help you fasten acrylic sheets effectively while preserving their clarity and structural integrity.